# wil.dev>
My personal blog and where I dump a lot of technical stuff that interest me.
One minute
LD47 War of the band
October 4, 2020
You are stuck in an endless war to control Band Co the worlds best elastic band company. Will you be the one to keep control of this company or will you be just another one in the end less loop of take overs.
You need to shoot enemies with elastic bands while avoiding them being shot back at you.
Be careful with your ammo supply and pick up more ammo in boxes around the level.
This is a simple ray casting game I crated in c++. Pretty happy with how it turned out despite a few bugs.
Controls
- - Arrows to move
- - Ctrl to shoot
- - Alt Use/Open
Links
Screenshots
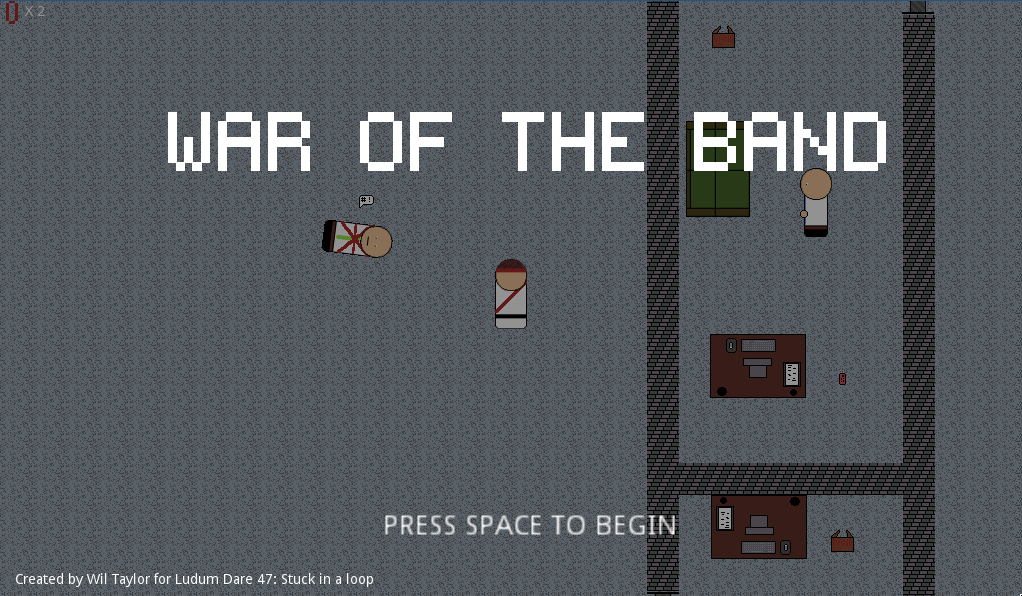
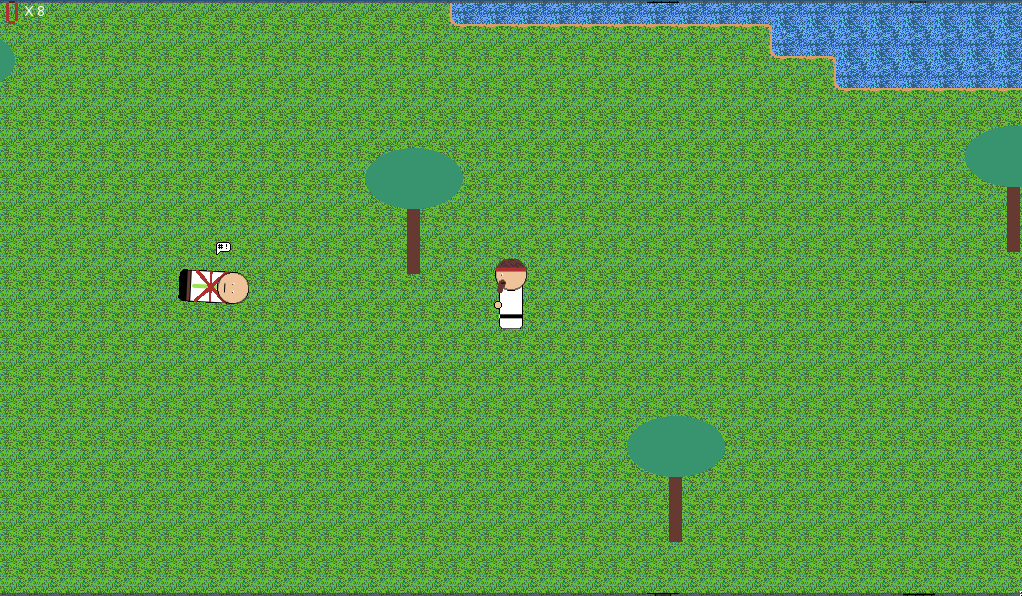
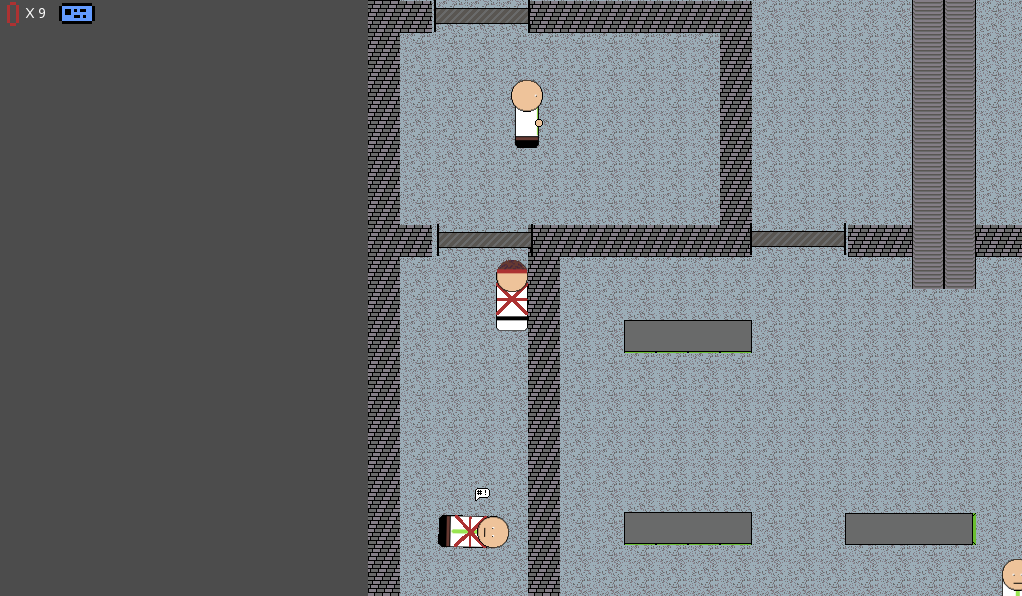
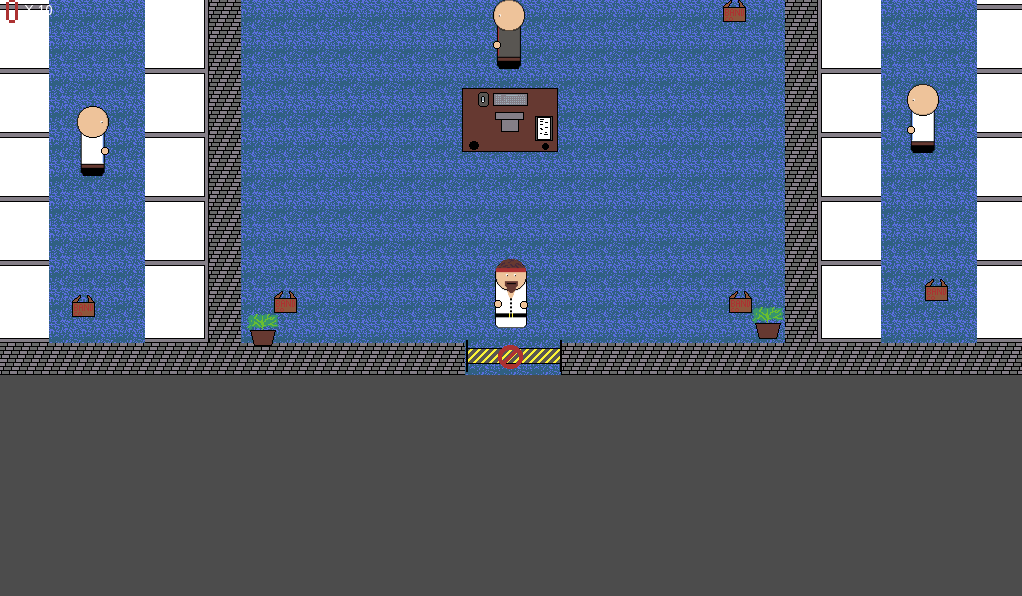
Timelapse
2 minutes
RMarkdown: Cooperating With Other People
September 13, 2020
Final chapter I am going to cover off how to work with other people using this markdown centric workflow.
R Markdown Co-Operation
This one is really easy, just stick your R Markdown files in a git repository and work on the files together like any other source code.
Working on Documents Created By Other People
This one is again pretty simple. You are going to have to just bite the bullet and open the document in Office (or WPS) and make the edit. It is not worth trying to convert the document to markdown make the edits and recompile it to send it back. This is just going to trash their formatting and make them made with you.
Receiving edits to your document from other people in word.
There are a few ways you can approach this. One is enable track changes on the document so you can see the changes they added and then update your markdown to match.
If they made a large change and didn’t annotate your document you can convert the word document back to markdown with pandoc.
pandoc updated-version.docx -f docx -t markdown -o updated-version.md
Once you have it back in markdown you can diff the version you have with their updates and make the changes.
Thankfully most companies these days are moving to online wiki style document collaboration like Confluence while not perfect are markdown driven so nicer to deal with.
RMarkdown Series
- 01 - Replacing MS Office
- 02 - Setting up R Markdown
- 03 - How to do common word tasks in R Markdown
- 04 - Generating presentations in R Markdown and Reval.JS
- 05 - Working with data and R Markdown
- 06 - Generating flow charts
- 07 - Creating books in Bookdown
- 08 - Misc other tools
- 09 - Co-operating with other people
2 minutes
RMarkdown: Misc Other Tools
September 13, 2020
I thought I would create a chapter on some other tools I use to replace Microsoft Office in my workflow
Joplin
This is a pretty good note taking application which for the most part has replaced OneNote in my workflow.
It supports Markdown as its language you write notes in and it even has support for mermaid diagrams inside the markdown which is nice.
Joplin also support synchronization over WebDav and has support built in for NextCloud and also has a Android and Mac Client.
Probably the only thing Joplin is missing is a web client.
Draw.io
While generating diagrams via code is really nice and is my preferred go to for creating flow charts and other types of diagrams there are times you want to drag and drop items onto a canvas to create diagrams.
For this I have started using Draw.IO which has an electron app and a version on their website.
I actually find the diagrams created by Draw.io to look better than visio ones. It also has a heap of extra shapes and its pretty easy to add your own.
WPS Office
While this isn’t OpenSource it is a Office suite that has good compatibility with Microsoft Office that runs on Linux. I generally only use this if I have to open Office Documents for some reason.
Online MS Office
You might think it is a good idea to use this when working with MS Office files as its free and online. I would actually recommend against it as its got less features than WPS Office and has some weird compatibility issues when dealing with documents created in Desktop versions of Office.
RMarkdown Series
- 01 - Replacing MS Office
- 02 - Setting up R Markdown
- 03 - How to do common word tasks in R Markdown
- 04 - Generating presentations in R Markdown and Reval.JS
- 05 - Working with data and R Markdown
- 06 - Generating flow charts
- 07 - Creating books in Bookdown
- 08 - Misc other tools
- 09 - Co-operating with other people
3 minutes
RMarkdown: Creating Books With Bookdown
September 12, 2020
One of the other nice things that can be done with R Markdown is you can create ebooks. Ebooks can be created by creating separate RMakdown files for each chapter then knit them all together to generate the book.
Ebooks can be created in the following formats:
- PDF (via LaTeX)
- HTML (GitBook style, Bootstrap style or Tufte style)
- EPub
rmb-book script
To get started with book down we actually have a new command to compile the book. Instead of calling render on a RMarkdown document like we have been previously we need to call render_book.
We can use the same docker image I introduced earlier in this tutorial but we will need to create a new script to call it.
Put the following into the rmb-book script and put it somewhere in your path (on my system its in ~/.local/bin) and
call chmod +x rmd-book on it.
#!/bin/bash
docpath=`realpath $1`
docker run --rm -v `pwd`:`pwd` --workdir `pwd` wiltaylor/rmarkdown:latest Rscript -e "require(bookdown); render_book('$docpath')"
First book
Now we have the script ready we can start on our book. First step is to create a new folder for your book and put a index.Rmd file in it.
---
title: Demo Book
author: Wil Taylor
output: bookdown::pdf_book
---

## Index.Rmd
This is some text in the index file.
Now to break this down:
titleandauthorare what you expect the title of the book and who wrote it.output- Like with regular R Markdown documents this controls the output file format. Unlike regular R Markdown though they have different values.- bookdown::gitbook - Generates html in a gitbook style.
- bookdown::tufte - Html book in a Tufte style.
- bookdown::pdf_book - Creates a pdf version of the book using LaTeX
- bookdown::epub - Generates a epub version of the book
Chapters
now we have the index.Rmd file created we can start working on chapters. The way chapters work is bookdown will import the index.Rmd file first and will then import all other Rmd files in the directory in alphabetical order. Because of this I suggest naming all your chapter files starting with the number of the chapter 01-foo.Rmd for example then 02-bar.Rmd. That way it will import them in the expected order.
More options
There are heaps of options and customizations you can make to your book. I suggest reading the bookdown documentation here.
RMarkdown Series
- 01 - Replacing MS Office
- 02 - Setting up R Markdown
- 03 - How to do common word tasks in R Markdown
- 04 - Generating presentations in R Markdown and Reval.JS
- 05 - Working with data and R Markdown
- 06 - Generating flow charts
- 07 - Creating books in Bookdown
- 08 - Misc other tools
- 09 - Co-operating with other people
2 minutes
RMarkdown: Generating Flow Charts
September 12, 2020
Flow charts are actually really easy in R Markdown if you make use of the DiagrammeR R package. This package is great because it adds support for both Graphiz and MermaidJS diagram formats (I have included DiagrammeR package in the docker image).
Graphs are pretty complicated so I have linked to their documentation here and will only show a few basic examples in this guide.
Note: As of time of writing this blog there was a problem inserting charts into non html documents. To work around this I added webshot to the docker image which will screenshot any html elements and add them as a png to documents.
Inserting a basic graphiz graph in your document.
Here is an example from the DiagrammeR documentation. Pretty simple to do you just need to import the DiagrammeR library then call grViz and put the Graphviz text inside a string.
``` {r, echo = FALSE}
library(DiagrammeR)
grViz("
digraph dot {

graph [layout = dot]

node [shape = circle,
      style = filled,
      color = grey,
      label = '']

node [fillcolor = red]
a

node [fillcolor = green]
b c d

node [fillcolor = orange]

edge [color = grey]
a -> {b c d}
b -> {e f g h i j}
c -> {k l m n o p}
d -> {q r s t u v}
}")
```
Inserting a basic mermaid graph
Like the graphvix example above I have put the mermaid style markup example from the DiagrammR docs here. Again just import the DiagrammeR library and then call mermaid with a string containing mermaid notation.
```{r results="asis",eval=TRUE,echo=FALSE,message=FALSE, error=FALSE, warning=FALSE, comment = NA,fig.height=10}
library(DiagrammeR)

mermaid("
graph LR
  A-->B
  A-->C
  C-->E
  B-->D
  C-->D
  D-->F
  E-->F
")
```
Which one to use
If you are wondering at this point which one to use my advice is use Mermaid for simple diagrams because its notation is a lot easier and use Graphiz for complex graphs.
RMarkdown Series
- 01 - Replacing MS Office
- 02 - Setting up R Markdown
- 03 - How to do common word tasks in R Markdown
- 04 - Generating presentations in R Markdown and Reval.JS
- 05 - Working with data and R Markdown
- 06 - Generating flow charts
- 07 - Creating books in Bookdown
- 08 - Misc other tools
- 09 - Co-operating with other people
3 minutes
RMarkdown: Working With Data and R Markdown
September 12, 2020
Generating documents from markdown is all well and good but one of the main draws of RMarkdown is the fact it can pull data from external sources.
While the main purpose of R Markdown is that it can run R in a document I personally rather working with python.
To run arbitrary python code you can make use of the python library called reticulate (installed in my R Markdown docker image).
Setup
First we need to run some R code to import the library we want and to setup the python virtual environment.
``` {r setup, include = FALSE}
library(reticulate)
virtualenv_create("my-proj")
py_install("matplotlib", envname="my-proj")
py_install("pandas", envname="my-proj")
use_virtualenv("my-proj")
```
Ok breaking this down we have the following:
-
{r setup, include = FALSE}- The braces indicate that the language specified needs to be executed at build time and include = FALSE hides the results and the code of the code block. Use this for setup code. -
In R we load the reticulate library so we can use python.
-
We are creating a virtual env called my-proj. You can name this what you want, its not important because it is going to be created in the docker container and thrown away at the end of the build.
-
We are importing the matplotlib and pandas packages into python.
-
Finally we are telling python to use the my-proj virtual environment for the rest of this document.
Creating a Graph from Python
Next we can run a block of python code which will generate a graph we want to put on the page.
``` {python, echo = FALSE}
import matplotlib.pyplot as plt

time = [0, 1, 2, 3]
position = [0, 100, 200, 300]

plt.plot(time, position)
plt.xlabel('Time (hr)')
plt.ylabel('Position (km)')
```
Breaking this code chunk down:
-
The
{python, echo = FALSE}as you have probably guessed executes python code in the block. Theecho = FALSEis similar to theinclude = FALSEabove. Instead of hiding the block altogether it only hides the code but will display the result (in this case a nice graph). -
The remainder of the code is just a simple example of using matplotlib python library to create a graph.
Creating a table from Python
If you want to output a table from data gathered from a script you can do the following:
``` {python, include = FALSE}
import pandas as pd

mydata = [ {
        "Id": 1,
        "Message": "fooo"
    },
    {
        "Id": 2,
        "Message": "bar"
    }
    ]

pandadata = pd.DataFrame(data=mydata)
```

```{r, echo = FALSE}
kable(py$pandadata, caption="Data from python")
```
Breakdown of the code above:
-
You will see 2 blocks of code. The python block and the r block. We are generating data in python and then using the r block to display it.
-
You will also see the use of the pandas package. This lets us create a pandas data frame which r can turn into a table using kable. I actually like this because it keeps the data and presentation a little seperate.
Importing a csv file into a table
This is probably the easiest of them all. You just need to add the following code block.
```{r, echo = FALSE}
kable(read.csv("./test.csv", header = TRUE))
```
Final thoughts
AS you can see what we can do with this is pretty much limitless. You also have the option of generating data in the file system as part of a script and then pulling it in via regular markdown.
RMarkdown Series
- 01 - Replacing MS Office
- 02 - Setting up R Markdown
- 03 - How to do common word tasks in R Markdown
- 04 - Generating presentations in R Markdown and Reval.JS
- 05 - Working with data and R Markdown
- 06 - Generating flow charts
- 07 - Creating books in Bookdown
- 08 - Misc other tools
- 09 - Co-operating with other people
3 minutes
Rmarkdown Presentations
September 8, 2020
Now to generate presentations its pretty easy. You just need to start your r markdown document with the following:
---
title: "My Awesome presentation title"
author: Wil
date: 1 Jan 2021
output: revealjs::revealjs_presentation
---
This will automatically generate a title page for you with the above detail on it and you can then fill out the rest of the slides like the following:
# Section 1

## Part 1
bla bla bla

## Part 2
more bla bla bla

# Section 2

## Part 1
some bla bla bla
The above will create a reveal js presentation in a 2D style. This means Section 1 and Section 2 will be accessible via pressing left and right and inside these sections the Parts will be accessible by pressing up and down.
Inside each of the areas you can use any other markdown you want, images etc. As the output will be in html you can also insert html too (i.e. embedded youtube etc)
Theming
Another nice thing about reveal js is the built in themes which are selectable by adding the theme and highlight to the header.
---
output:
  revealjs::revealjs_presentation:
    theme: sky
    highlight: pygments
---
This selects from a list of pre-made themes which are:
- default
- simple
- sky
- beige
- serif
- solarized
- blood
- moon
- night
- black
- league
- white
Also you can set the style of code highlighting to the following (or null if you want to turn it off):
- default
- tango
- pygments
- kate
- monochrome
- espresso
- zenburn
- haddock
Slide transitions
You can also control the slide transitions with the following settings:
---
output:
  revealjs::revealjs_presentation:
    transition: fade
    background_transition: fade
---
transition is when moving up and down between slides and can be the following values:
- default
- fade
- slide
- convex
- concave
- zoom
- none
background_transition is when moving a full page left and right and can be one of the following:
- default
- fade
- slide
- convex
- concave
- zoom
- none
Slide backgrounds
You can change the background of a slide by using the data-background properties like the following:
## CSS color background {data-background=#ff0000}

## Full size image background {data-background="background.jpeg"}

## Video background {data-background-video="background.mp4"}

## A background page {data-background-iframe="https://example.com"}
More options
There are heaps of options to what you can do with revealjs from R Markdown. Reveal JS by itself also has pretty good markdown support. The reason I decided to use R Markdown though was to keep it consistent with the rest of my document generation strategy.
I suggest reading the documentation on R Markdown if you want to learn more about it.
RMarkdown Series
- 01 - Replacing MS Office
- 02 - Setting up R Markdown
- 03 - How to do common word tasks in R Markdown
- 04 - Generating presentations in R Markdown and Reval.JS
- 05 - Working with data and R Markdown
- 06 - Generating flow charts
- 07 - Creating books in Bookdown
- 08 - Misc other tools
- 09 - Co-operating with other people
3 minutes
RMarkdown: Common Word Tasks Rmarkdown
September 8, 2020
Now that you have the rmd command to start building documents you should already know how to do a lot stuff in markdown and how it will translate into MS word.
The flavor of markdown that R markdown uses is Pandoc markdown which has a nice reference here.
With that you can get away with most of the content of a document that you would want.
---
output: word_document
---

# My awesome document
Templates
MS Word
For creating templates for word documents it couldn’t be any easier. You just create a document and then update the styles to what you want.
Then you can reference it in the header like this.
---
output:
    word_document:
        reference_docx: ./Template.docx
---
More reference documents on this here. The main one to keep an eye on is how you need to find the table style.
HTML
For html you can create a template html file by doing the following:
output:
  html_output:
    template: my-template.html
Then you can create a template html file like the following. You simply have to place a $body$ tag where you want the content to be placed.
<head>
</head>

<body>
$body$
</body>
You also have the ability to place content from the header into the template too like the following
foo: bar
output:
  html_output:
    template: my-template.html
<head>
</head>

<body>
<p> My foo is a $foo$ </p>
$body$
</body>
For the full documentation on html output see the documentation. There is a heap of things you can change.
PDF generation is done via LaTeX which means you have a million options (also the reason by the docker image is over 2GB in size).
The basics however are you can specify different parts of the resulting LaTeX document with the includes setting (each of them is optional).
---
output:
  pdf_document:
    includes:
      in_header: "preamble.tex"
      before_body: "before.tex"
      after_body: "after.tex"
---
As you can see you can add code to the preamble and also before and after the body of the document. I won’t go into the syntax for latex here because its a massive topic and would need a tutorial of its own.
I will however put some example templates in the git repository.
It is also worth looking at the r markdown documentation on what you can do here too.
Multiple output
Another thing that is cool about R Markdown is you can also output to multiple formats at the same time. To do this you just simply have to create multiple entries under output like the following:
output:
  pdf_document: default
  html_document: default
RMarkdown Series
- 01 - Replacing MS Office
- 02 - Setting up R Markdown
- 03 - How to do common word tasks in R Markdown
- 04 - Generating presentations in R Markdown and Reval.JS
- 05 - Working with data and R Markdown
- 06 - Generating flow charts
- 07 - Creating books in Bookdown
- 08 - Misc other tools
- 09 - Co-operating with other people
3 minutes
RMarkdown: Setting Up R Markdown
September 7, 2020
The first thing you will notice if you try to install all the software required is the prerequisites are huge. Most of this is LaTeX which is well over 1GB.
I don’t recommend trying to install this on your base system for the following reasons:
-
Good luck getting a consistent install cross platform.
-
It will add a lot of packages to your system and if you run a rolling Linux Distro like I do you will be updating it every day.
-
If you break it you are going to be in a world of pain trying to fix it.
So the way I propose you use it is via a docker image. The nice thing about using it this way is:
- It leaves your base system alone.
- You can stick it up on docker hub and share it with ci like github actions.
- If the image breaks you can go back to previous versions easily.
Docker Image
I have created an image based off Arch Linux which has the latest and greatest packages required to generate documents and I have pushed it to docker hub so its pretty easy to use.
All you need to do is make sure you have docker installed. Or if you are on Linux take a look at the arch wiki entry on it.
Rmarkdown script
Now create the following script file on your system. I recommend copying it into a location in your path so you can use it easily but you can call it via its full path if you want to.
rmd
#!/bin/bash
docpath=`realpath $1`
docker run --rm -v `pwd`:`pwd` wiltaylor/rmarkdown:latest Rscript -e "require(rmarkdown); render('$docpath')"
Now the way this document works is it will generate a document from the document passed to it. There is one big catch though, the working directory must be either the same as the target file is in or lower down in the tree. (i.e. if you add /foo/bar.txt you need to also be in the /foo directory.)
Now that you have the script setup lets create some test files.
test1.rmb
---
output: word_document
---

# Hello MS Word
test2.rmb
---
output: pdf_document
---

# Hello PDF
test3.rmb
# Hello HTML
And then run the following commands against them.
rmd ./test1.rmb
rmd ./test2/rmb
rmd ./test3.rmb
If everything worked you should now have a test1.docx a test2.pdf and a test3.html files.
Editor/IDE
You have a few choices here. The main one that most people will recommend is R Studio which is a full IDE specifically designed for working with R.
Personally however I just use Visual Studio Code with an RMarkdown plugin or even vim if I am in the shell. My goal was to create a workflow that let me work in the same places i code in. However feel free to use whatever you feel comfortable with.
Examples
I have also created a bunch of examples in the repo I created for the docker image which you can get to here.
RMarkdown Series
- 01 - Replacing MS Office
- 02 - Setting up R Markdown
- 03 - How to do common word tasks in R Markdown
- 04 - Generating presentations in R Markdown and Reval.JS
- 05 - Working with data and R Markdown
- 06 - Generating flow charts
- 07 - Creating books in Bookdown
- 08 - Misc other tools
- 09 - Co-operating with other people